Building a Pixel Clock: 3D-Printable Case for ESP32 and LED Matrix
| Shelf | AI & ML |
|---|---|
| Date in | |
| Readers | 436 |
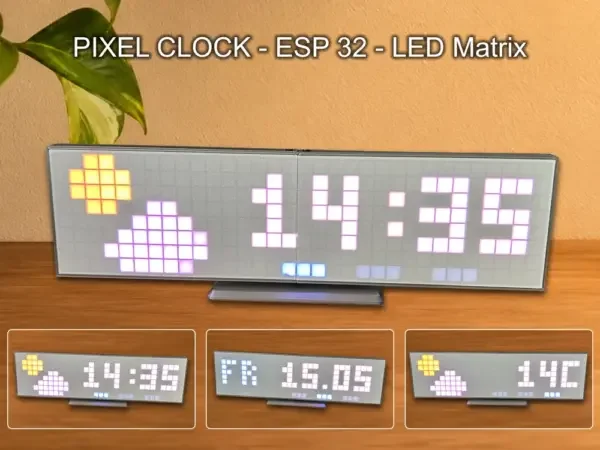
Explore the design and functionality of a 3D-printed case for the Pixel Clock project, integrating an ESP32 Dev Board with an 8×32 LED matrix.

Introduction to the Pixel Clock Project
The Pixel Clock project merges the capabilities of the ESP32 Dev Board with an LED matrix, presenting DIY enthusiasts with a unique chance to craft a timekeeping device tailored to their tastes. This initiative isn't just a simple clock; it's a canvas for technology enthusiasts to explore their creativity. By incorporating modern 3D printing techniques, makers enhance both the visual and functional elements of their clock designs. Particularly appealing to engineers and product managers, this project allows for the integration of similar cutting-edge technologies in professional developments, making it a practical exploration of theoretical knowledge.
Project Overview
At the heart of this initiative is a 3D-printable case for the Pixel Clock, which features an 8×32 LED matrix that delivers bright visual output. The ESP32 Dev Board dimensions play a significant role in the design of the enclosure, with options available in two versions — USB-C (28.5×51.8mm) or Micro-USB (28×54.8mm). Obtaining an 8×32 LED Matrix Frame is essential, and a diffuser grid is recommended to spread the light from the LEDs evenly, boosting readability. This aspect is often overlooked, but a well-designed diffuser not only enhances aesthetics but also improves functionality, making it easier for users to read the time at various angles and lighting conditions.
Design and 3D Printing Details
The design includes two assembly options for the frame: a screw-mounted version, which requires eight M3×4 screws, and a more straightforward glue-on variant. The 3D printing process is relatively user-friendly, with a suggested layer height of 0.28mm, featuring two wall outlines and a 15% infill percentage. Printing this model takes about 7.2 hours and uses roughly 338g of PLA filament. For hobbyists and professionals alike, tracking these parameters is vital for budgeting both time and material expenses in preparation for the build.
The enclosure thoughtfully incorporates a dedicated compartment for the ESP32, along with designated channels for cables. This design choice not only enhances the aesthetic appeal but also significantly streamlines the assembly process, which can otherwise be cumbersome. Additionally, the inclusion of a stand—which utilizes M4×8 screws, M3×15 screws, and M3 nuts—allows users to adjust the clock’s position. This flexibility is important; it makes placement easy whether on a nightstand or a desk, furthering the project’s accessibility.
Firmware and Software Integration
When it comes to software, the Pixel Clock project relies on readily available firmware hosted on GitHub under the repository mBlinkii/PixelClock. This open-source nature is significant. It enables users to easily modify configurations and adapt the software to their preferences. Engineers experimenting with customizations will appreciate this flexibility, as it opens avenues for creative expression through varied clock face designs. Integrating existing libraries simplifies matters for those already familiar with the ESP32 platform, allowing them to tailor functionalities without having to start from scratch.
Considerations for Compatibility and Performance
Before you dive into your build, it's crucial to look into the compatibility of the ESP32 with your chosen LED matrix. There are alternatives out there, such as the NeoPixel clock, which offer different lighting technologies and control mechanisms. These alternatives can fundamentally change the visual impact and interactivity of your clock—so choose wisely. If you're working in this space, getting the technology pairing right is essential for realizing optimal performance.
Limitations and Future Enhancements
However, there are limitations to the current setup. It was primarily designed with aesthetic appeal in mind, which sometimes means functional features were sidelined. For future versions, integrating wireless capabilities could elevate the project. Imagine a clock that automates time adjustments based on GPS data or responds to environmental changes, like dimming automatically as the day wanes. Moreover, expanding functionalities to include information beyond just the time—like calendar reminders or notifications—could add to its usefulness. The potential here is substantial, and the community would likely welcome enhancements that bridge this gap.
Implications for Makers and Future Outlook
This Pixel Clock project highlights the intersection of 3D design and electronics, a domain ripe for exploration and innovation. As technology advances and more resources become accessible, the possibilities for enhancing DIY projects expand significantly. This development could be more than just a trend; it might signal a shift toward more interactive and versatile home technology. For aspiring engineers, this project presents a practical tutorial in merging hardware with creative design strategies.
Concluding Thoughts
The Pixel Clock project stands as a testament to what can be achieved by merging electronics with 3D printing. For those involved in product design or engineering, it’s an invitation to explore new avenues of creativity. The challenge of customizing and optimizing this technology is not just a task but a significant opportunity for personal and professional growth. So, for those interested in taking on a rewarding challenge, you can access the necessary files for 3D printing on MakerWorld. Don't miss out—dive into the world of DIY clocks and make your mark in the maker community.